
These jobs are best done during warm months, so make them part of your regular spring home maintenance routine.

1 of 18
Clean air conditioner condensers and evaporators
A little sweat equity now will help both your wallet and your comfort level later when summer’s heat sets in. Most of the job can be done without the help of a professional, and by servicing and testing out your cooling system now, you will have plenty of time to make an appointment with an air conditioning contractor if there’s any unforeseen issues.
After cutting off the electricity to the unit, vacuum the outdoor condenser’s exterior fins with a soft-bristled brush, and clear away bushes, weeds and overgrown grass within two feet of the unit. Do NOT use a pressure washer as the fins are very thin and damage easily.
Indoors, replace the furnace filter on the evaporator unit, vacuum the blower compartment, and clean the condensation drain.

2 of 18
Re-Paint the front door
The best option is to perform touch-up painting on your home exterior every year or two. Just a few hours of exterior painting each year can add significantly to the life of your whole paint job!
Ask any paint manufacturer, painting is a task that’s best done when the weather is mild outside, typically above 50 degrees and not too humid. If your front door has seen better days, it might be a good time to give it a fresh coat of paint. For best results, remove the door from the hinges and remove all of its hardware. Give it a good cleaning to allow the paint to adhere properly, and scrape off any buildups of paint or areas where the old paint is chipping off.
When your prep is done, use a high-quality brush to edge in around the door’s windows and panels, then switch to a high-density foam roller to apply two light coats to the whole door, that will ensure no brush marks. If your home was built before 1979, check the paint for lead before you scrape or sand.

3 of 18
Repair rotted wood
After winter snow melts and the April showers leave your property damp, it’s a good idea to inspect for signs of rotted wood. If you find any areas in need of replacement, use a polyester filler to rebuild the damaged areas.
First, use a 5-in-1 tool to remove the rotted wood from the area. Then press the filler into the recesses of the wood with a putty knife, building up the layers as needed until you have a smooth profile. You should have between 10-15 minutes to work with the polyester filler before it begins to harden. The new structure will take paint well and won’t rot again in the future.

4 of 18
Sharpen garden tools and lawn mower blade
Pruning, clipping and shearing are most useful when clean, precise cuts to the plant are accomplished, and the only way to guarantee that is to regularly maintain your tools. Pruning shears, hedge shears and grass clippers each have two sharp surfaces which are finely ground at the factory to their most efficient angle.
Pick up a new 10-inch mill file at your local home center, and file the blades along their original factory bevel. Sharpening the blades along any other edge will ruin an otherwise perfectly good set of shears or clippers. The safest way to achieve this is by clamping the blade firmly in place with a vise. Move the file in one long motion away from you, exposing clean metal, for the best results.

5 of 18
Check your deck
Now that it’s the perfect weather to spend free time entertaining outside on the deck, perform an annual inspection on the whole structure to ensure everything is safe and in top shape for your family and guests. While well-built decks will last for decades, some that are 15 or more years old, when building codes were different, or possibly the work of a DIYer who owned the home before you, warrants careful inspection for certain key things.
Problems to look for are rotted or wobbly posts and railings, weak post connections, properly-fastened ledger boards, and missing flasher ledging. Most of the wood deck repair tasks are inexpensive and you should be able to complete them yourself.

6 of 18
Re-Caulk outside
Exterior caulking is imperative for keeping water out of susceptible areas around the outside of your home. In the spring, it’s a good idea to walk around the outside of the house and look for areas in need of caulk where water may be working its way inside, or signs of existing but failing caulk.
When you’ve identified the problem areas, you’ll want to clean out the area and apply either an acrylic or polyurethane formula. Acrylic is easier to use and clean up, and is a good choice for cracks narrower than 1 inch. Polyurethane, which is more difficult to work with, may be worth the effort for concrete, roof, or gaps wider than 1 inch. Once you’ve picked your product, thoroughly clean the area before application.

7 of 18
Patch driveway cracks
Inspect driveways and paths. Freezing and thawing is rough on concrete, asphalt and other hardscaping materials. Take a walk around your property to look for damage to walkways, paths and schedule repairs as needed. Asphalt can often be patched, but damaged concrete may need to be replaced entirely. Not only are driveway cracks unsightly, but if left unattended, they can take years off the life of your driveway.
The most surefire way to repair cracks for good are by using melt-in filler, which, unlike squeeze bottle and caulk tube-type products, will not shrink over time. Plan on spending a full day to repair several cracks, and wait for a warm day with no rain in the forecast. It’s important to widen hairline cracks first with an angle grinder and diamond wheel so the filler will last.
Thoroughly clean the cracks of dirt and debris with a leaf blower or air compressor before applying the filler. The prep may be time-consuming, but it’s worth it in the long run.

8 of 18
Clean weep holes in windows
Weep holes may be the tiniest feature of many sliding windows and vinyl replacement windows, but they serve a big function. The little holes, located on the exterior bottom of the frame, are an outlet for rainwater to drain away from the home, but they often can become clogged up with debris.
To make sure they’re working properly, spray the outside of the window with a garden hose – a steady stream of clean water should exit from the holes. If it doesn’t, use a wire hanger or compressed air to force the blockage out. Re-test with fresh water to ensure they’re completely cleaned.

9 of 18
Tune up the lawn mower and weeder eater
A few upgrades to your lawn mower in early spring will extend the life of the machine and give your grass a cleaner cut. At the start of the season, empty any old gasoline left over from the previous year into a clearly-marked container and replace it with fresh fuel.
Next, change the oil, this should be done every 25 hours of use or so. Run the mower for a few minutes to get the oil warmed up, which will help it to drain more smoothly.
Last, swap out the old air filter and change the spark plug. Spark plugs can be found at the hardware store for about $3, and are critical in starting and running the engine.

10 of 18
Test and replace the batteries in smoke detectors
Smoke detectors should be tested monthly, and the batteries should be replaced every year, so it’s a good habit to make this part of your regular spring or fall maintenance routine. Test the batteries by simply pressing the ‘test’ button and making sure the unit chirps. Even if it works, replace the battery (or back-up battery, if your is a hardwired model) and re-test it.
If the alarm does not pass the test, replace it immediately. Smoke detectors have a lifespan of 10 years, so look for a ‘replace by’ sticker or date embossed on the inside of the unit to see if it needs to be replaced, even if it passes the chirp test. If you can’t find a date, replace it anyway immediately. On new detectors, make sure to write the ‘installed’ date on the inside cover on a piece of masking tape.
11 of 18
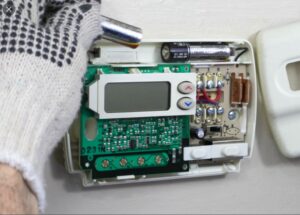
Replace the thermostat battery
Thermostats can be simple dial- or switch-controlled thermostats, or they can be programmable digital thermostats. Programmable thermostats can be set to raise or lower the house temperature during specific times of the day to keep utility bills in check. Wall thermostats typically use AA or AAA alkaline batteries or 3V button-style lithium batteries. The battery of the thermostat keeps your programming saved and prevents your heating and cooling control system from turning off when the power goes out. Change your wall thermostat batteries once a year, or when the low battery indicator appears on the digital display.

12 of 18
Replace the garage door remote keypad battery
In normal residential use of remotes, the batteries typically last about two years. Automatic garage doors are usually powered by a battery. If they’re not working, the assumption is that the cells have been drained. It’s not a big issue, and all you have to do is replace them. Here’s a step-by-step guide on how it’s done:
- Find where the batteries are placed. They’re typically located in a compartment at the bottom of the control box.
- Open the compartment. Some models have covers that slide right off, while others may need to be unscrewed.
- Take the old batteries out and dispose of them.
- Put in new batteries (usually a 9 volt). Place them inside the compartment properly by following the instructions stamped on the product.
- Close the compartment.
- Test if everything is working as it should.

13 of 18
Tune-up outdoor gas grills
No matter what your recipe is, the best burgers are cooked on a clean, well-maintained grill. Before cookout season kicks off, give your grill a once-over. Look for food drippings and grease buildup on the exterior, which can attract pests, and scrub these spots with a brass-bristle brush and soapy water.
To clean the grates, light the burners, close the lid, and let the grease drip off for 15 minutes. Turn the flame off and let the grill cool until it’s warm, which will make easier work of removing any grime. Use a brass-bristled brush or wadded up aluminium foil for this step.
To service the burner assembly, unfasten the burner and disconnect the gas tubes from the gas lines. Lift out the whole unit and use a soft cloth and soapy water to clean the gas tubes and burner unit. Finally, clean the drip pan thoroughly with warm, soapy water.

14 of 18
Check sprinkler and irrigation systems
Checking your sprinklers or irrigation systems in the spring can save water – and save your plants.
- Run the system through all the zones manually and walk the property.
- Make sure none of the heads are broken or damaged.
- Adjust any heads that are spraying the house, especially windows, as this can cause moisture problems.
- Adjust heads that are spraying the street, sidewalk or porches to avoid wasting water.
- If you don’t know how to maintain your sprinkler system, call a professional to do it. You’ll save money on your water bill and protect one of our most valuable natural resources.

15 of 18
Prevent mosquitoes
In recent years, we’ve become more aware of the potential danger mosquitoes can pose to our health. West Nile virus and Zika virus are just the latest diseases caused by these winged pests.
The best way to prevent mosquitoes around your home is simply by getting rid of any standing water. Walk around your property; if you see anything or any area where water stands, fix it, tip it, get rid of it or maintain it regularly.

16 of 18
Check screen doors and windows
Screens are designed to let the breeze flow in and keep bugs out – but they can only do their job if they’re free from holes and tears. Before setting up your screens for the warm months ahead, be sure to carefully check each one and repair any holes or tears, no matter how small. You can find screen repair kits at most hardware and home improvement stores.

17 of 18
Inspect roof
Winter storms can take quite a toll on the roof. When spring arrives, start by making a simple visual inspection of your roof. It doesn’t require a ladder, and you certainly don’t have to get on a roof to look. Use binoculars or a camera or smartphone with a telephoto feature if you need to. Look for missing shingles, metal pipes that are damaged or missing or anything that simply doesn’t look right. If you notice anything that needs closer inspection or repair, call a roofer.

18 of 18
Paint exterior
Considering our climate, homeowners should expect to repaint their home every six to ten years. If you’re planning to repaint your home’s exterior this year, spring is a good time to set it up.
Exterior paint maintenance does depend on the material or the siding that is used on your home. Paint on stucco generally lasts longer than it does on wood trim, which means that homeowners with wood siding should expect to repaint their homes more often than their neighbours with stucco.
If you have problem areas on the exterior of your home, such as peeling window seals or fascia boards, it’s a good idea to put two finish coats on those areas. Start with a high-quality primer paint, and then follow with two coats of finish paint—a three-coat system.
Click here for a pdf copy of Moneysense home maintenance check list for the spring